Thursday, April 02, 2009

April

april


I took this picture at my daughter's home in Bossier City. To me, spring is the most beautiful season in Louisiana and azaleas definitely mark the start of new beginnings in this area.

I decided to add the seasonal quote to honor the month of April and it's beauty and the leaving behind of the heavy coat of winter drudgery for the light, carefree days of spring.

Labels: ,

posted by Marsha at 1 Comments

Wednesday, January 28, 2009

Creating Photo Booth Strips

*** quick edit made to emphasize the download location / link to Nicole Seitler's Photo Booth Strip template file.

Several people commented on the photo booth posts I did earlier here and here, indicating an interest in how I created the strips. I will attempt to explain in this post how I accomplished that in the graphic program I use, Paint Shop Pro (which I will also refer to as PSP). These instructions assume that you are comfortable working with layers and moving between multiple open images on the screen and that you know how to use basic tools and commands in PSP.

You can use other programs to complete this project if your software allows for the creation of layers within a file and if you know how to adapt the commands and tools used by PSP to the commands and tools your software uses to perform the functions I am describing. If you're not comfortable with my instructions or can't convert them, you can Google for instructions for creating a photo booth strip specific to your software, be it Photoshop, Elements, Irfanview, GIMP, etc., or feel free to contact me through the comments section or by email and I will try to help you find what you need. I'm sure there are better written, more complete, easier to understand tutorials out there for this type of project but I said I would try and I am good for my word (as well as being good and wordy)!

Again, my instructions are based on the commands in Paint Shop Pro, (I use version X2 but you should be able to do this in all versions of PSP). I've used PSP for years and I highly recommend it as it does almost everything that Photoshop CS software will do at a fraction of the cost and generally is easier to learn. It far exceeds the ability of Photoshop Elements, which is similarly priced to Paint Shop Pro. I will intersperse some screen shots in with the instructions to try to help clarify what I am describing. With that said, we'll get started.

The first thing you need is a template for the strip. You can Google for a photo booth strip template or simply go to Sugarplum Paperie to download the zip file which contains the template I used. Extract the template to your hard drive, noting where you are saving it to for access later. The zip file includes both a black strip and a white strip with four openings available in each strip for photo insertion. You can use either one according to your preference.

1. Once you have a strip template, choose the photos you want to insert in the strip and open all of the images, including the strip in your software. If you need to edit the photos you are using in the strip, please do so before you begin the process outlined below. (For the sake of brevity, which Lord knows is not my strong point, I will limit my directions to placing one photo in one opening with the understanding that you will complete the remaining three photos in the same manner.)


Click to enlarge the photo to see more detail.

This is how my program looks when I have opened the template file and my first photo (which I chose to crop before inserting into the strip as you'll notice in the next screen shot).


2. Making the photo strip your active image, grab the magic wand selection tool from the toolbar, which in my workspace is placed down the left side of the screen; it may be elsewhere in your version(see it highlighted in the screen shot below). Touch the magic wand anywhere in the area of the first or top opening of the photo strip. If you don't see the magic wand on your toolbar, click on the little down arrow of the selection tools section of your toolbar and a sub menu will pop up with all of the available tools displayed and choose it there. Once you have selected the opening, you will see that the open area inside the selection is surrounded by what is commonly termed as 'marching ants'. Then go to the Selections menu at the top of your screen and choose Modify, then Expand, then Expand Selection by two pixels. The reason for this is to make sure that your photo will completely fill the opening and not have any blank area around it when the photo layer is moved beneath the template layer.

Click to enlarge the photo to see more detail.

This image shows the selection tool I used (the magic wand) on the toolbar down the left side of the screen (circled in yellow highlight) and the cropped version of my first photo. On the right side of the screen image, I circled in yellow highlight where my new layer shows up in the layer palette. At this point the layers are named raster 1 and raster 2. I recommend renaming your layers just to keep track of where you are in the process. The template image is the active image in this screen shot. If you view a larger version of the screen image, you can see a dashed line representation of what's termed the 'marching ants' around the selection of the first photo opening. In the open program, the selection will actually be moving around the selected area hence the term 'marching ants' but since this image is static, you can't see that motion here. The new raster 2 (photo) layer will ultimately be pulled under the existing raster 1 (template) layer as you will note in a later screen shot.

Just a quick note on cropping and the shape or size of the photo to be inserted. If you decide not to crop your image -- and please understand that you do not have to -- just know that if you choose to insert a photo that is obviously not similarly shaped to the opening, it might scrunch up and distort the photo image more than you would like. Example: your photo is in landscape format (wider than longer) going into a space on the template that is portrait shaped (longer than wider), it will distort when you paste it into the selection. I prefer to crop to get the best view of the photo I am using and to also make sure it is somewhat similar in shape as the opening on the template I am going to insert it into. You do not have to be exact, although you can be if you want. I don't go to that much trouble. You can also make any other edits you wish to your photo before placing it into your strip. I won't describe all the possible edits here as I think a 10 page post would be just a tad much (as if this isn't already stressing the limits of any normal human to stay focused). I generally make minor edits to enhance most photos I use in any project. I probably have a couple of more age lines than you see in this photo! *grin*


3. Keeping your selection active, go to the Layers palette (your photo strip template file should still be active) and click on the add new layer button or you can go to the Layers menu at the top of the screen and select New Raster Layer. I would suggest renaming this new layer something like 'photo1' or 'photo layer 1'. You will eventually have 5 layers total, one for the template, and four image layers, one for each photo you will insert in the strip. Naming them will help you keep them straight. You can do that when you add the layer or later, whichever is easiest for you.

4. Making sure that you have the new layer active in your template file (it will be highlighted in your layer palette) move to your first photo image and simply choose copy from the edit menu, then return to your photo template image and from the Edit Menu at the top of the screen, choose Paste Into Selection making sure you are on the new layer you created for the photo. Regardless of how large your photo image was, it will insert fully within the space defined by the marching ants that you selected earlier. Go to the Selection menu at the top of the screen and click on Select None and the marching ants will disappear.

Click to enlarge the photo to see more detail.

This is how my screen looks after I have pasted the first photo into the selected opening of the template. If you look at the layers palette on the right, you can see the image of the photo on the new layer.


5. Return to the layers palette and highlight the photo layer and pull it under the template layer. You can also change the order of the layers by going to the Layer menu at the top of the screen and select Arrange. You can move the active layer to whatever position you would like in the file. Rename your layer(s) if you have not done so.

Click to enlarge the photo to see more detail.

This screen shot shows how the photo layer has been moved under the template layer and the changes in the layer names. I highlighted the entire area around the layers palette and underlined the layer names in this shot.


6. At this point, I would suggest saving the file in pspimage format. This format preserves the layers format where saving as a jpg or png will save the file as a single layer image. If you are not using Paint Shop Pro, the image format for saving in layer format will be called something different. Just make sure you choose to save as the file type required by your software to retain the layers. You will eventually merge the layers at the end of the process but until you have completed the project, you will want to be able to get your work back if you should make a mistake.

Congratulations, you have just completed the first image insertion. If you look in your layer palette area, you should see two layers, both with images now. The top layer should have your photo strip template and the layer below it should have the image you just pasted into selection. If the photo layer is on top, move it below the template where it should be. The image file itself will display both layers at the same time, looking like a single entity, but rest assured, both layers exist if the layers palette shows two layers (you can even turn individual layers on and off on the layers palette if you want).

All that's left to do now, is to repeat the steps in the preceding paragraphs (from step 2 through 6) for each of the remaining three photos. Just remember to create a new layer for each photo naming it accordingly, select the next opening in the photo template file, copy the next photo then paste each photo INTO the selected area of the template file on it's own layer and save the file as a pspimage after each photo is added. That's the condensed version... and this version didn't take 242 paragraphs to explain it all!

In PSP, as in most software, you can accomplish any task in a variety of ways. I simply tried to explain a way (or two) to accomplish each task in the most common manner or ways available. I personally use many shortcuts within PSP but felt like that would be even more confusing if you're not familiar with my particular methods. If you know other ways to do the same thing, by all means, work in the way that best suits you or that you are most comfortable with.

I hope that these instructions are clear enough for you to follow and that you like your results well enough to display it on your blog or elsewhere. If you wish, you can send your results to me via email and I will will be glad to post them here.

Please don't hesitate to contact me for help. I'm relatively new to tutorial writing so any questions you send to me will help me learn to write clearer instructions. If you find that you just can't do it at all, let me know that too and we can work together to determine whether the instructions are just too complicated or if I need to rate it as being for more advanced users. Remember, you're helping me here too!

I know I tend to be wordy and hope I haven't tried to over-explain and ended up confusing you instead of simply showing you how to complete this project. Let me know if that's the case so that I can do better the next time (if there is a next time that is). I wish any of you who attempt this project good luck and I look forward to seeing your results!

Credit to Nicole Seitler at Sugarplum Paperie for the photostrip. Be sure to visit her site, even if you don't want to try this project as she has some lovely creations and other freebies to share. Just be sure to thank her in her comment section and if you do choose to download something as a result of my link, please let her know that you came from my blog!

Labels: ,

posted by Marsha at 4 Comments

Tuesday, January 27, 2009

The Tutorial Will Post Tomorrow!

Just to let you all know, I'll be posting the tutorial on how I did the photo booth strips sometime tomorrow, Wednesday, January 28, 2009. It will be after the Wordless Wednesday post goes up so check back later in the day if you are interested.

Labels: ,

posted by Marsha at 0 Comments

Wednesday, January 14, 2009

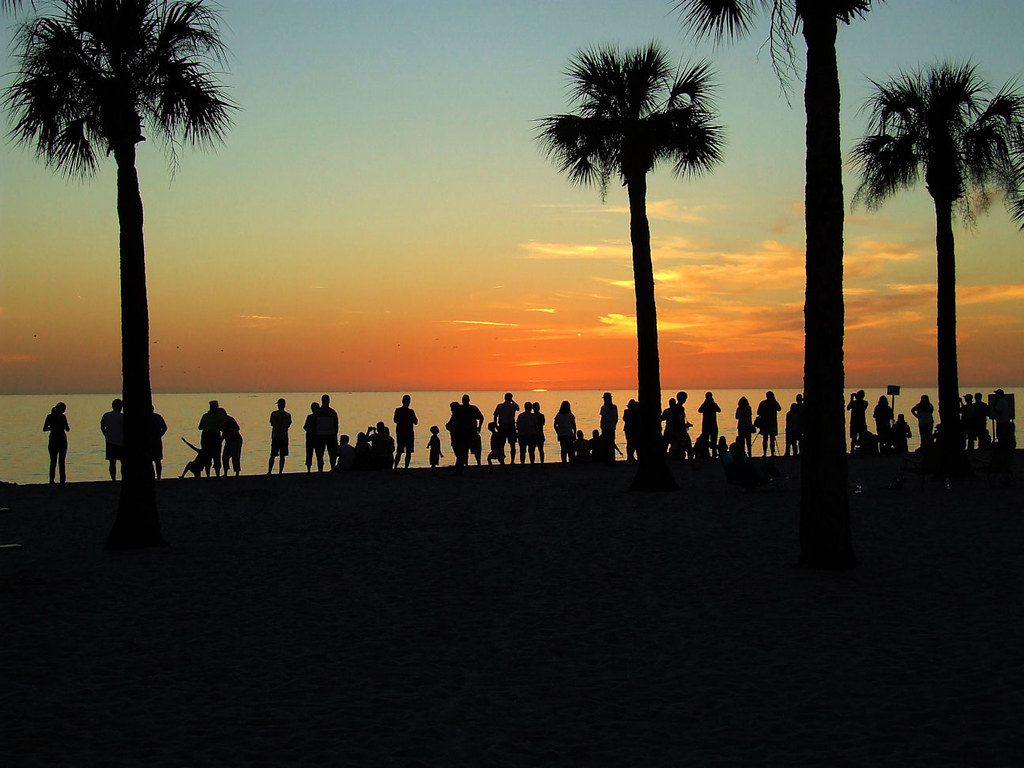
Wordless Wednesday - Sunset Silhouette

Sunset On Hernando Beach, Spring Hill, Florida
you can view a larger version of this file by clicking on the photo and accessing it through my flickr account

I took this picture on the beach at sunset on Sunday, December 28, 2008, the day after we arrived at my daughter's house in Florida. We barely made it there in time to get pictures before the sun disappeared completely. The photo was edited in Paint Shop Pro to enhance the color and create the silhouette effect. I love silhouettes.

We saw several dolphins near the shore shortly after this picture was taken but I wasn't able to get through the throng of people in time to get a clear photo of them.

Check out Wordless Wednesday to see a list of all participants in this weekly meme.

Labels: , ,

posted by Marsha at 16 Comments

Sunday, January 11, 2009

Another Photo Booth Post


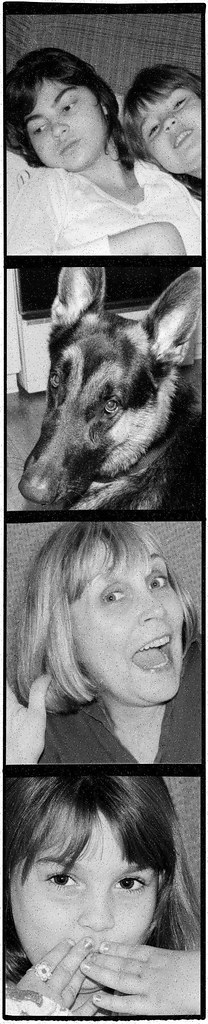
Here is another photo booth strip I made from pictures taken at my daughter's house in Florida this past week. The bottom two were taken in "Kayla's Photo Booth" that we made at the end of their hallway by hanging a blanket to create the background. The other two pictures were taken elsewhere or at different times during my visit and I included them in this strip because I thought Kayla would like them.

The top photo in the strip is Kayla with her older sister Anna on Kayla's birthday. The next one is of Luger, their 'puppy'. Kayla loves Luger! Once we started taking pictures for her photo booth strips, Kayla decided she wanted to take a picture of me. I helped her a little but she had to make sure I was in the frame before she clicked the button. She did a pretty darn good job! The tripod helped both of us as I used the optic zoom to make sure we got closeups. Don't ya just love my hair... I didn't expect to be in the pictures and didn't think to run a comb through my hair before I turned the camera over to her! I had fun hamming it up though! I also tried using the timer and I got one really good picture of her alone using the timer when I experimented with it but I managed to change the setting when I tried to get into the picture with her and only had two seconds to get in. I only caught part of one of my arms and part of my chin... too funny! It will be good for out-takes if I ever put together an album of these pictures though! I love the pose Kayla struck in the last picture. She is a natural and we had a great time together doing this. Our photo booth session will be a special memory for me from this trip!

I wanted to see how the black and white would look against the color version. I'm not very happy with the noise I added to make it look more like an old photo strip. I didn't get the effect I was after with that but was too tired of messing with it to change it. I still need to do a final version of the strips to print out and send to her so I'll make corrections then. I will probably do both color and black and white to send her.

I will do my best this week to write up instructions on placing the pictures in the strip for those who asked.

The template I used for the photo strip was downloaded from the web. I failed to give credit for it in the last post but here is where you can get the strip if you decide you want to do this project someday.

Nicole Seitler
www.SugarplumPaperie.com

The zip file has both a black and a white strip available and is a free download.


Labels: , , , , , , , ,

posted by Marsha at 3 Comments

Tuesday, December 09, 2008

About Me and Getting Back to Graphics

I've been in a low place for some time and unable to make myself do many of the things that I enjoy, which only serves to contribute to the problem. It is a diagnosed condition and has a name. It's called dysthymia, which is simply a mild, long lasting form of depression. Sometimes I can get the best of it, but often as not, it gets the best of me. Most of this past year has been a win for dysthymia. I hate it. I seldom use medication, but have seriously considered it this time around. I think I may be on the verge of overcoming it so I am going to hold off for a while to see what happens. I wish I had not let it get this far along and have made a promise to myself that I won't let it go this long again without getting a script for a mild anti-depressant.

My point here is that when I start getting more active with the things I enjoy, I know that I am on the mend. I've done a few things in my favorite graphics program recently and thought I would post one of my little projects here. Since I've also let my interest in photography drift, I went back to my interview with Sarah stash of photos to do a little project that I came up with from viewing the works of others.

Here is the SOOC photo that I started with. It is okay, but nothing earth shattering beyond the fact that any picture of Sarah is terrific in her Mimi's opinion.


I cropped out the portion of the photo that I wanted to display and used Paint Shop's internal one step photo fix on the new image. Instant improvement without having to go through a lot of individual steps to get pretty much the same results. After that, I added a contrast adjustment layer to boost the contrast and merged down. I then used the dodge tool to brighten the whites of her eyes (on a duplicate layer) then flattened the image and burned the outside edges with the burn tool to add interest to the photo. The last step, before saving the cropped image, was to sharpen the image with the unsharp mask. I did resize both versions before uploading to keep the size and load time down. Here's the finished product.


I think this version really pops and lets others see the bright and beautiful Sarah that I see in person. My camera and my photo skills just can't seem to do that without help. The adjustments were minor with dramatic results in my opinion. I hope you like it!

My granddaughter's birth has made me want to create things she will love. ~Billy Crystal

The reason grandchildren and grandparents get along so well is that they have a common enemy. ~Sam Levenson

Labels: , , ,

posted by Marsha at 3 Comments

Wednesday, August 20, 2008

Wordless Wednesday - August 20, 2008

Before and After


P0003243

P0003243_


My daughter Dee took this photo on her first trip to Scotland three years ago (at least I think it was three years ago). The copies I have of those pictures are compressed but are good enough for display on the web. I play with them in PSP to this day. On this edit, I cloned out the power line and the time stamp before brightening and pulling out the contrast in the photo. The process removed the color cast, which I think lent a sort of old world tone to the building but I was pleased enough with the results to save this one as is. At least for the time being!

Visit Wordless Wednesday to find out what it's all about and to see a listing of all of today's participants.

Labels: ,

posted by Marsha at 18 Comments

Monday, May 05, 2008

Finally

I think I finally have something close to what I was after!

erin homecoming_bw3

This was the look I was after.

erin homecoming_bw3_border

A simple crop and a border frame is all I needed to finish it off!

Labels: , ,

posted by Marsha at 5 Comments

Playing With Pictures

I just never got quite what I wanted from my efforts.

erin homecoming_bw

I converted this photo of Erin from color to B&W. I decided to clone out the straps from her dress in an effort to get a more 'sophisticated' look. I also cloned out a portion of the background that I felt was distracting. I was not totally happy with the results... it's okay but I wanted special.

erin homecoming_soft tint

This is a soft-tint version of the same photo. I left the straps from her dress in this version. I like this one better than the B&W but it is still lacking something.

erin homecoming_ubw

This is the B&W version without the gaussian blur step and with a strong tint applied after the conversion from color. My son likes this one best and it comes the closest to what I had in mind when I started playing around with it earlier this evening. It is certainly more dramatic than the other two but I still didn't get quite what I wanted from my efforts. I've decided that the back ground is part of my dissatisfaction.

I wonder which one Erin will like the best.

Labels: , ,

posted by Marsha at 3 Comments

Saturday, March 22, 2008

The Face Of Sixty-One

Today is my birthday. I'm sixty-one years old today. Sometimes I still feel just like I did when I was a young child, at play, eager and learning something new every day; sometimes I still feel like I did when I was a teenager, carefree and experiencing those first innocent tastes of what adulthood and a life of responsibility would bring; sometimes I'm still the young bride who believed she would forever be with the love of her life or the young mother, who learned quickly that there were lives far more important than her own; sometimes I still feel like that woman in early middle-age, struggling with growing children, a loss of love, trying to balance family and a demanding job and the unfairness of the world; sometimes I actually feel my own age, appreciative with thankfully only a few aches and pains and more thankfully only a handful of regrets; sometimes **gasp** I feel even older, bent and tired when I let the aches and pains and regrets get to me! The only thing that surprises me anymore is how quickly time seems to move and just how inhumane human beings can actually be towards one another. But those are topics for another day.

Today, I am posting a picture of me. Okay it's not really the face of sixty-one as it was taken almost three years ago... but I really haven't changed that much in less than three years and I don't have a more recent photo that was professionally taken. I will admit that it helps to know your way around Paint Shop Pro (or Photoshop if that is your graphic weapon of choice). A little gaussian blur blend layer works for most portraits. This photo was done by Olan Mills for our church directory so it needed only a slight blur. I used it with a scrap tutorial that came through one of my groups. I seldom, if ever, use photos of me to do these things with and decided that I would post this for my birthday when it came around.

So here I am, looking life square in the eyes!


Tomorrow is my granddaughter Emily's birthday. She will be 14. I'm going to their house in Bossier City for a combined birthday celebration and Easter dinner and to make Emily a chocolate pie (yes, from scratch, the one from my good old standby Betty Crocker cookbook) with meringue piled as high as we make it! My son John will be there too. My daughter and granddaughters in Florida will call. How I wish they could be there in person too. I hate the distance that separates us, but learned after moving away from my family and hometown years ago, that distance doesn't change how much you love one another only how often you get to see each other.

What advice do I have to offer after sixty-one years? Just to look life square in the eyes and to take each day as it comes. I really wish I was better at that!

Labels: ,

posted by Marsha at 9 Comments

Monday, March 17, 2008

Happy St. Patrick's Day!


Happy St. Patrick's Day!

Labels: ,

posted by Marsha at 2 Comments

A New Animation


I'm not really big into animation although I've done many animated tags in the past. I decided to try this one since I hadn't done one in awhile. It's based on a tutorial that came through one of my groups from Sweet's site. I decided to post it here since I haven't put any animations up on the blog before. Not one of my best but I like the subject I chose for this one!

Labels:

posted by Marsha at 1 Comments

Tuesday, March 04, 2008

March Wind

I do not know who wrote this poem. I have seen it used several times with no credit given and even a google search failed to turn up an author. I thought it worked well against this background and particularly in my life right now as March has definitely come roaring into Louisiana.

march wind

Labels: ,

posted by Marsha at 0 Comments

Tuesday, February 26, 2008

Addicted

Yep, it's one of my guilty pleasures in life and I'm so sorry that y'all have to feel the brunt of it! When I play around in Paint Shop Pro I want to show off what I've done regardless of whether it is worthy of showing off or not. Mostly because of the effort I went to in order to get a specific result.

Anyway, here's a couple more projects I've worked on recently. The first one I just finished using a photo of Sarah from a few months ago. This was another Photoshop tutorial I transformed to work in PSP. Come to think of it, so is the other one of Erin and her friends. This picture was taken the same time Sarah's was, the night of Erin's homecoming dance. The effect is supposed to be a retro comic book strip look. I'm not sure the photo was well suited for the effect but again, I had fun, which is what counts the most in my opinion.

If you wonder why I use so many Photoshop tutorials, the reason is that there are so many more tutorials written for Photoshop because of the sheer number of users. I'm not sure why as PSP has almost the same capability, albeit sometimes more difficult because the development has not kept up since Corel took over the product. What is an easy function in Photoshop often must be manually duplicated in PSP. The commands are not the same although the effect is... it's just a matter of learning the program well enough to know what gives a specific effect no matter what you call it. I like the extra challenge but sometimes wish Corel would add some of the newer functionality directly into the program.

Anyway, bear with me while I go through another PSP phase. I'm sure I'll get over it fairly soon as I need to clear out the laundry and dishes I've let pile up while I've been playing. Ginger's pretty upset with me too... she wants to take a few more walks than the oh, say NONE that we've taken the past few days! As usual, Woody K. doesn't care!

sarah_polaroids

erin_retrocomic2

Thanks for looking!

Labels:

posted by Marsha at 3 Comments

Monday, February 25, 2008

My Brother's House

My brother and his wife live in a really nice older farmhouse that they bought some years ago and have remodeled over the years. I took several photos of the house on one of my visits home because I promised my sister-in-law that I would paint a picture of the house. I haven't done that yet but yesterday I did play with a small version of one of the photos I took in Paint Shop Pro.

The first photo is as it came straight out of the camera. The second one is an edited version where I lowered the color value through a desaturation process then used blend modes and sharpening to get the effect that I wanted. The third version is the result of a Photoshop tutorial I found on the web and converted it for use in Paint Shop. The process digitally duplicates an effect from a cheap Russian camera called Lomo photography. Rather than try to explain the effect here, you can read about it at the site where the tutorial is found. I'm not sure how effective I was at producing a true Lomo photography effect but I enjoyed trying.

al_em_house_sooc_small

al_em_house_desatprocess

al_em_house__lomoprocess

I like each of these versions of the photo for different reasons but mostly because I got to spend time playing in PSP.

Labels:

posted by Marsha at 2 Comments

Tuesday, January 22, 2008

Spoofing Photoshop

I got a link this morning in email to a site with video tutorials for Photoshop that I found hilarious. There are three videos at the site and they all actually teach you a little something about using Photoshop (or can be applied to other graphic programs) in an amusing manner as Donnie opens up his less than perfect life for use in his tutorials.

If you are a prude easily offended by mildly off color humor you might want to take a pass on Donnie's videos entitled "You Suck at Photoshop".

Labels: ,

posted by Marsha at 0 Comments

Saturday, January 19, 2008

da Girlz!


I spent some time playing around in PSP today and this is the result of a blending assignment in one of my groups. I love working with photos of the girls. Unfortunately, I cannot download the most recent pictures from my camera as I have misplaced my cable. My media reader does not accept the xd card from my camera so I will either have to get a replacement cable or find an adapter.

What's up with my losing so many things... I swear I have Alzheimer's.

Labels:

posted by Marsha at 3 Comments

Wednesday, January 09, 2008

Messin' Around with PSP

A couple of weeks ago, we were over in Bossier at my daughter's to have Christmas with her and my three granddaughters. I took several pictures of course and have done some playing around with them and thought I would put a couple of the results out here.


The first one is a picture of Erin's new puppy, Bijou, who weighed in at the time at slightly over 1 pound. He was having a blast finding sticks and twigs and chewing and playing with them when he came upon what was for him, a log. He tuckered himself out trying to move this thing around. Bijou was a Christmas present and is a Maltese and Chihuahua mix and a very tough little fellow. He scared everyone Christmas night when they had to make a trip to the emergency clinic with him. It was touch and go but he came out of it just fine... this photo was taken less than a week later.

Credits: the photo was taken by me but I am not sure where the frame came from. I apologize to the creator for losing their identity.

The next one is a picture of Erin and boyfriend Nick. No, I didn't make a mistake, I actually took several pictures of them barefoot outside on the last Sunday in December. Don't be concerned, I think it was close to 80 that day.

Credits: the photo was taken by me and edited in Paint Shop Pro using a tutorial I found on the web.

Labels: ,

posted by Marsha at 2 Comments

Sunday, November 11, 2007

Remembering

Honoring Dad Veteran's Day 2010
thinking of dad on Veteran's Day and always!

praying for all Veteran's and giving thanks for their service!

Credits: Papers - DSA Autumn Leaves_PP04 and DSA Autumn Leaves_PP01; Photo edge PSP; Fonts used are Papyrus and Monotype Corsiva; all else is mine

Labels: ,

posted by Marsha at 3 Comments

Friday, October 26, 2007

More Playing With Paint Shop Pro Effects

These files are of two of my favorite subjects.

The first one is a sketch effect I applied to an old photo of Sarah Grace, who is now 11. She was maybe 4 or 5 in this picture. What a girlie girl she was in her feather boa!


The second one was a little more complicated. It is of Emily and started as a black and white shot that I selectively added color to. I added green to her eyes and a sort of soft reddish pink to her lips and a light brush of the same color to her cheeks. I duplicated layers of her photo, created one with a gradient fill to dramatize the original bw then applied blend modes to get the end result. I really just played around until I got tired of messing with it I was happy with the result then added simple line borders to finish it out.


Either way, I seem to be coming out of my creative doldrums a bit. Maybe I'll eventually get more creative with the entries to this blog!

Labels: , ,

posted by Marsha at 1 Comments